
Page 1: The Magic of the Holiday Confectionery
Headline: A Christmas Miracle in a Pan: Why Gingerbread Fudge is the Ultimate Holiday Treat
When the air turns crisp and the scent of pine begins to fill our homes, our kitchens naturally gravitate toward the warm, comforting spices of the season. Among the vast array of holiday treats, few manage to capture the essence of December as effectively as Christmas Gingerbread Fudge. This is not your average chocolate fudge; it is a sophisticated, white-chocolate-based confection infused with the deep, earthy sweetness of molasses and the sharp, aromatic bite of ginger and cinnamon.
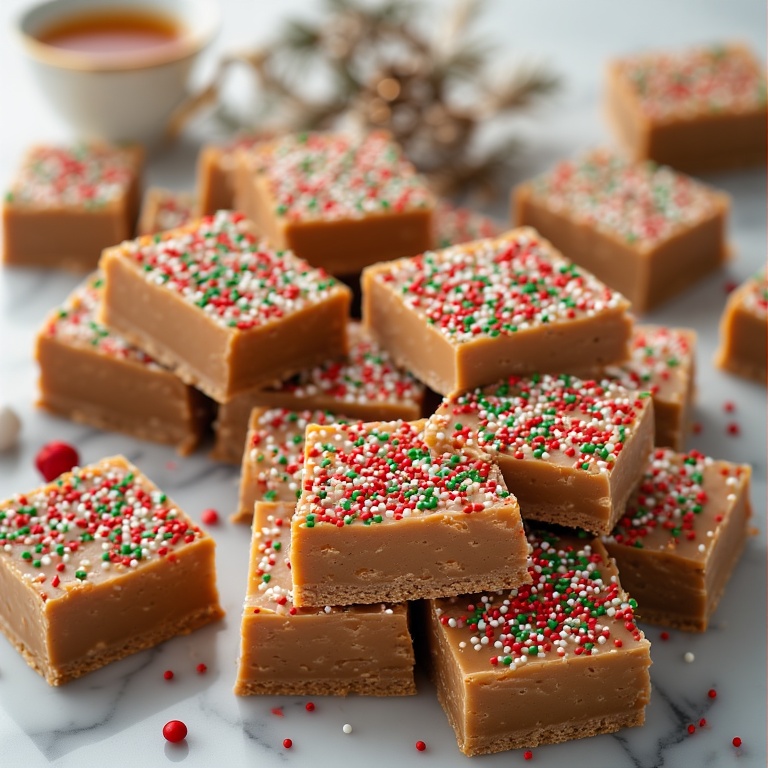
As seen in our featured imagery, this fudge is defined by its smooth, tan-colored base and a festive crowning of red, green, and white nonpareils. It represents a bridge between the classic American fudge tradition and the centuries-old European gingerbread legacy. It offers a dense, creamy mouthfeel that melts slowly, releasing layers of spice that warm the palate.
In this exhaustive 2,000-word guide, we are exploring the delicate chemistry of white chocolate stabilization, the historical significance of molasses in winter baking, and the technical reasons why this specific ratio of spices creates a flavor profile that is both nostalgic and luxurious. This is the definitive resource for holiday bakers looking to master a “no-fail” fudge that serves as the perfect gift or party centerpiece.
The History of Gingerbread and the Evolution of Fudge
Gingerbread has been a staple of winter celebrations since the Middle Ages, originally valued for the preservative qualities of ginger. Fudge, an American innovation from the late 19th century, was traditionally a chocolate-heavy affair. Combining these two worlds creates a modern holiday classic. By using white chocolate as a base instead of dark cocoa, we allow the subtle notes of ginger and cinnamon to shine through, creating a “blonde” fudge that looks as beautiful as it tastes.
Ingredients Deep-Dive—The Spices and the Science
Headline: Sourcing the Season: Why Every Gram of Ginger and Molasses Matters
To achieve the professional, clean-cut squares visible in our photos, the quality and ratio of your ingredients are paramount. This recipe avoids the traditional candy thermometer method, opting for a highly stable white chocolate melt.
1. The Creamy Canvas: 4 Cups White Chocolate Chips
-
The Role: White chocolate provides the structural integrity of this fudge.
-
The Science: Unlike dark chocolate, white chocolate contains cocoa butter but no cocoa solids. This makes it more sensitive to heat. Using high-quality chips ensures a smooth melt without “seizing,” providing the perfect medium to carry the gingerbread spices.
2. The Soul of the Spice: 2 Tablespoons Molasses
-
The Flavor: Molasses is the byproduct of refining sugar cane.
-
The Impact: It is the ingredient that provides that distinct “gingerbread” depth. It offers a dark, slightly bitter sweetness that cuts through the richness of the white chocolate chips.
3. The Aromatic Duo: 2 Teaspoons Ginger & 2 Teaspoons Cinnamon
-
The Balance: These two spices are the pillars of the holiday scent profile.
-
The Ratio: We use an equal 1:1 ratio to ensure that neither spice overwhelms the other. The ginger provides the “zing,” while the cinnamon provides the warm, woody base.
4. The Visual Finish: Red, Green, and White Sprinkles
-
The Aesthetic: As shown in the images, the sprinkles aren’t just an afterthought; they signify the holiday theme.
-
The Timing: Applying these while the fudge is “tacky” but not fully set ensures they stay embedded in the top layer without sinking into the middle.
The Masterclass—Step-by-Step Culinary Instructions
Headline: The Perfect Set: Mastering the “No-Bake” Gingerbread Fudge Technique
Creating this fudge is an exercise in temperature control. While it is a “no-bake” recipe, the way you handle the heat determines if your fudge is silky or grainy.
Step 1: Pan Preparation
Line an 8×8 inch square baking pan with parchment paper, leaving an overhang on the sides. This “sling” method allows you to lift the entire block of fudge out of the pan for clean slicing once it is set.
Step 2: The Gentle Melt
In a heavy-bottomed saucepan over low heat, combine your 4 cups of white chocolate chips with the 2 tablespoons of molasses. It is vital to keep the heat low; white chocolate can burn or separate if it reaches a temperature above $110^\circ F$ ($43^\circ C$). Stir constantly with a silicone spatula until the mixture is 90% melted.
Step 3: Infusing the Spices
Once the mixture is nearly smooth, stir in your 2 teaspoons of ginger and 2 teaspoons of cinnamon. Adding the spices at the end of the melting process preserves their volatile oils, ensuring the strongest possible aroma and flavor.
Step 4: The Pour
Immediately pour the warm fudge into your prepared pan. Use an offset spatula to smooth the top into an even layer. Work quickly, as white chocolate-based fudge begins to firm up as soon as it leaves the heat source.
Step 5: The Festive Garnish
While the surface is still wet, liberally apply your red, green, and white sprinkles. Press them very lightly with the back of a spoon to ensure they are anchored.
Step 6: The Long Chill
Allow the fudge to cool to room temperature on the counter for 30 minutes, then transfer it to the refrigerator. For the best texture, let it set for at least 4 hours or overnight. This allows the cocoa butter in the chips to crystallize fully, giving you those sharp, professional edges when cut.
Troubleshooting, Storage, and Global Variations
Headline: Professional Perfection: How to Store and Share Your Holiday Fudge
Troubleshooting Common Issues
-
“My fudge is oily on top”: This happens if the chocolate was melted too quickly on high heat, causing the fats to separate. To prevent this, always use a low setting or a double boiler.
-
“The texture is grainy”: This usually means a drop of water got into the chocolate (seizing) or the sugar in the molasses didn’t incorporate. Ensure all your tools are bone-dry before starting.
-
“It’s too soft to cut”: The fudge simply needs more time in the fridge. White chocolate takes longer to reach full stability than dark chocolate.
The Art of Slicing
To get the perfect squares seen in our photos:
-
Lift the fudge out of the pan using the parchment paper sling.
-
Run a large chef’s knife under hot water, then wipe it dry.
-
Slice the cold fudge in one clean downward motion. Wipe and reheat the knife between every single cut.
Storage and Longevity
-
Fridge: Store in an airtight container for up to 2 weeks. The flavor actually deepens after the first 24 hours as the spices meld with the molasses.
-
Freezing: This fudge freezes beautifully. Wrap the entire block or individual squares in plastic wrap, then place them in a freezer bag. It will stay fresh for up to 3 months—perfect for early holiday prep!
Conclusion: A Sweet Tradition
The Christmas Gingerbread Fudge is more than just a sweet; it is a labor of love that brings the iconic flavors of a gingerbread house into a creamy, bite-sized format. By following this guide and respecting the ratios of molasses and spice, you will create a treat that becomes a requested staple of your holiday tradition.