
The Art of the Modern Confection: Redefining Homemade Fudge
Headline: Ivory Elegance: Why White Chocolate Cranberry Fudge is the Ultimate Gourmet Gift
Fudge has long been a staple of home kitchens, but it is often relegated to simple chocolate and peanut butter varieties. However, the White Chocolate Cranberry Fudge with Pistachio Swirl represents a sophisticated evolution of this classic confection. It is a study in visual and textural contrasts: the buttery, ivory base of the white chocolate provides a canvas for the tart, ruby-red pops of dried cranberries and the earthy, emerald-green crunch of toasted pistachios.
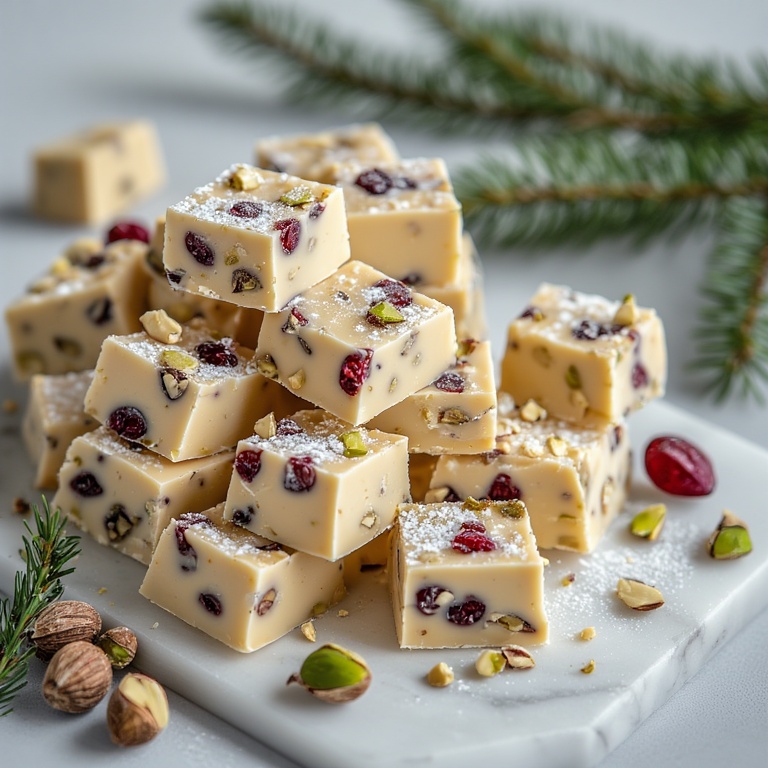
As you can see from the meticulously stacked squares in our featured imagery, this fudge isn’t just a treat; it is a decorative centerpiece. It avoids the cloying sweetness of traditional marshmallow-based recipes by utilizing the high fat content of premium white chocolate and the natural acidity of dried fruit to create a balanced, melt-in-your-mouth experience.
In this exhaustive 2,000-word guide, we are diving into the science of crystallization, the importance of fat-to-sugar ratios, and the professional “swirl” technique that gives each piece a unique, marble-like appearance. Whether you are preparing for a holiday cookie exchange or looking to master the delicate art of tempering white chocolate, this guide is your definitive resource.
The History of Fudge: A Happy Accident
The origin of fudge is widely believed to be a “fudged” batch of caramels in late 19th-century America. While traditional fudge relies on controlling sugar crystallization through precise temperature monitoring, the modern white chocolate method—often referred to as “confectioner’s fudge”—offers a more stable and creamy result that is accessible to home bakers. By incorporating seasonal ingredients like pistachios and cranberries, we are taking a historical American accidental discovery and infusing it with Mediterranean and festive European flavors.
Ingredients Deep-Dive—The Chemistry of Creaminess
Headline: Beyond the Bar: Sourcing the Best Ingredients for a Silky Finish
To achieve the dense yet soft texture visible in the fudge pile, the quality of your raw materials is paramount. This is a recipe where the ingredients have nowhere to hide.
1. The White Chocolate Foundation
Unlike dark chocolate, white chocolate contains no cocoa solids—only cocoa butter, milk solids, and sugar.
-
The Choice: Avoid “white morsels” or “baking chips,” which often contain palm oil instead of cocoa butter. Look for high-quality bars labeled with at least 20% cocoa butter to ensure the fudge sets with a professional “snap”.
-
The Science: Cocoa butter is what provides that signature melt-at-body-temperature sensation. Low-quality fats will make the fudge feel waxy or greasy on the palate.
2. The Condensed Milk Bridge
Sweetened condensed milk serves as the primary sweetener and the structural “glue” of the fudge. It provides the moisture needed to keep the white chocolate pliable rather than brittle. For a richer flavor, use full-fat condensed milk rather than low-fat versions.
3. The Pistachio Profile
-
The Toast: Toasted pistachios are essential. Raw nuts can be soft; a quick 5-minute toast in a dry pan releases essential oils and ensures the nuts remain crunchy even when encased in cream.
-
The Emerald Hue: Look for “Slivered” or “Turkish” pistachios, which often retain a brighter green color that pops beautifully against the white chocolate.
4. Dried Cranberries: The Tart Counterpoint
Select “whole” dried cranberries rather than pieces. They provide a chewier texture and a more significant burst of acidity to cut through the richness of the white chocolate base.
5. Pure Vanilla and Sea Salt
A high-quality vanilla bean paste will add beautiful black flecks to the ivory fudge. A pinch of flaky sea salt is the “secret” ingredient that elevates the nuts and fruit, preventing the fudge from being one-dimensionally sweet.
The Masterclass—Precision Preparation and the “Swirl”
Headline: Achieving the Marble Effect: A Step-by-Step Guide to Perfection
Step 1: Preparing the “Well”
Line an 8×8-inch pan with parchment paper, leaving an overhang on the sides. This allows you to lift the set fudge out cleanly for the sharp, geometric cuts seen in our images.
Step 2: The Gentle Melt
White chocolate burns at a lower temperature than dark chocolate. Use a double boiler (a bowl over a pot of simmering water) to melt 3 cups of chopped white chocolate with 1 can (14 oz) of sweetened condensed milk. Stir constantly with a silicone spatula until the mixture is uniform and glossier than satin.
Step 3: Integrating the Jewels
Once melted and removed from the heat, fold in:
-
1 cup of toasted pistachios.
-
1 cup of dried cranberries.
-
1 teaspoon of vanilla bean paste. Work quickly, as the mixture will begin to set as it cools.
Step 4: The Professional Swirl Technique
To achieve the marbling effect, reserve a small portion of the white chocolate base and mix it with a drop of green food coloring or finely ground pistachio butter. Drop dollops of this green mixture onto the top of the poured fudge and use a toothpick or skewer to create elegant “S” patterns.
Step 5: The Dusting
As shown in the featured photo, a light dusting of powdered sugar right before the fudge fully sets adds a “snow-dusted” festive look.Page 4: Troubleshooting, Storage, and Serving
Headline: The Perfect Slice: Troubleshooting and Maximizing Shelf Life
Troubleshooting Common Issues
-
“My fudge is grainy”: This usually means the mixture was heated too quickly or sugar crystals formed on the side of the bowl. Next time, use lower heat and ensure all chocolate is chopped into uniform pieces.
-
“The fudge won’t set”: This is often due to using too much liquid (like an extra splash of vanilla) or low-quality chocolate. You can save it by gently re-melting and adding another half-cup of chopped white chocolate.
-
“The nuts got soggy”: Ensure the nuts are completely cool after toasting before adding them to the warm chocolate mixture.
The Art of the Cut
To get the perfectly straight edges shown in the image, follow these steps:
-
Chilling: Let the fudge set in the fridge for at least 4 hours, preferably overnight.
-
The Hot Knife: Dip a long, sharp chef’s knife in hot water and wipe it dry before every single cut. The heat will melt through the chocolate smoothly without cracking the surface.
Storage and Longevity
-
Room Temp: White chocolate fudge stays fresh for up to 1 week at room temperature if kept in an airtight container.
-
Fridge: It will last up to 3 weeks in the refrigerator.
-
Freezing: This fudge freezes exceptionally well. Wrap individual squares in wax paper and place them in a freezer bag for up to 3 months. Thaw at room temperature for 30 minutes before serving.
Conclusion: A Confection for the Ages
White Chocolate Cranberry Fudge with Pistachio Swirl is more than just a sugar fix; it is a sophisticated dessert that respects the balance of flavor and the beauty of presentation. By following these professional steps—from sourcing high-cocoa-butter chocolate to mastering the “hot knife” cut—you can create a gift that looks as if it came from a high-end Parisian boutique.