
Step-by-Step Instructions
Step 1 — Soak the Beans
The night before (or at least six to eight hours ahead), place the dried navy beans in a large bowl and cover with several inches of cold water. The beans will absorb water and roughly double in size during the soak; make sure the water level is several inches above the beans to accommodate this expansion. Soak at room temperature. When ready to cook, drain the soaked beans in a colander and rinse under cold water. They should be firm and swollen but not beginning to sprout or smell sour. Set aside.
Step 2 — Build the Flavor Base
Heat the olive oil or butter in a large, heavy-bottomed soup pot or Dutch oven over medium heat until shimmering. Add the diced onion, carrots, and celery and cook, stirring occasionally, for 5 to 7 minutes until the onion is translucent and beginning to soften at the edges. The vegetables should be cooking rather than steaming — a gentle sizzle in the pan is the right sound. Add the minced garlic, bay leaf, dried thyme, smoked paprika, black pepper, and half teaspoon of salt. Cook, stirring continuously, for one minute until the garlic is fragrant and the spices are toasted. This brief spice-toasting step is what wakes up the dried spices and deepens their flavor contribution to the finished soup.
Step 3 — Add Ham, Beans, and Broth
Nestle the ham bone into the pot among the softened vegetables, or add the diced cooked ham and stir it through the aromatics. Pour in the drained soaked beans. Add the eight cups of chicken broth, ensuring all the beans and the ham are submerged by at least an inch of liquid — add water to bring the level up if needed. Stir gently to combine. The liquid will look pale and thin at this stage; it will darken, thicken, and deepen significantly during the simmer.
Step 4 — Bring to a Simmer and Cook
Raise the heat to medium-high and bring the pot to the edge of a boil — look for large, slow bubbles beginning to break the surface. Immediately reduce the heat to low so the soup is at a gentle simmer: small, steady bubbles rising at the sides and center of the pot, but no vigorous boiling. Partially cover the pot with the lid tilted so steam can escape. A vigorous boil clouds the broth and can burst the beans before they’re properly tender throughout; the gentle simmer produces a clearer, more flavorful broth and more evenly cooked beans. Simmer for one and a half to two hours, stirring every 20 to 30 minutes, until the beans are completely tender throughout with no firmness remaining at the center when pressed between fingers. Add water or additional broth during the simmer if the level drops below the beans and vegetables.
Step 5 — Handle the Ham Bone
Once the beans are fully tender, use tongs or a slotted spoon to carefully remove the ham bone from the pot and transfer it to a cutting board. Allow it to cool for five to ten minutes until it can be handled safely. Pick off all the remaining meat from the bone, cutting any large pieces into roughly half-inch chunks. Discard the bone, cartilage, and any large pieces of fat. Return all the picked ham meat to the pot and stir it through the soup. If using diced ham rather than a bone, add an additional handful of ham pieces at this stage for extra substance if desired.
Step 6 — Adjust Consistency and Season
Assess the soup’s thickness. Ham and navy bean soup should be substantially thick — more like a stew than a thin broth soup — with a broth that is cloudy and slightly viscous from the dissolved bean starch rather than clear. If it is thinner than you prefer, use the back of a large spoon or a potato masher to lightly crush some of the beans against the side of the pot, incorporating their starchy interior into the broth. This thickens the soup quickly and significantly. If it is thicker than you prefer, stir in additional water or broth until the consistency is right. Taste and adjust the seasoning — the soup will need more salt and pepper than the amounts added during building the flavor base, but the exact amount depends entirely on the saltiness of the ham and broth used. Add salt in small increments, tasting after each, until the soup tastes properly seasoned.
Step 7 — Finish and Serve
Remove and discard the bay leaf. Stir in the chopped fresh parsley if using. Ladle the soup into bowls while piping hot, making sure each bowl gets a generous portion of beans, ham, and vegetable pieces. Serve immediately with crusty bread, cornbread, or warm dinner rolls alongside.
Tips for the Best Results
Don’t skip the overnight soak. Soaked beans cook more evenly throughout than unsoaked beans — the gradual overnight rehydration produces a more uniformly textured bean where the center is as soft as the exterior. Unsoaked beans can take an additional thirty to forty-five minutes and may produce beans that are slightly harder at the center than the outside even after the same total simmer time.
Keep the simmer gentle throughout. A vigorous boil causes the beans to break apart prematurely, producing a porridge-like texture with no whole beans remaining. It also emulsifies fat from the ham into the broth, producing a greasy, cloudy result rather than a clear, richly flavored one. The gentle simmer — small, steady bubbles — is what produces the characteristic thick-but-clear broth of a properly made ham and bean soup.
Don’t add salt until the end. Both the ham bone and the chicken broth contribute salt to the soup throughout the simmer. The salt content of ham bones varies significantly between hams; some are very salty and some are mildly cured. Starting with low-sodium broth and seasoning by taste at the end is the only reliable way to avoid an over-salted soup that can’t be corrected after the fact.
Use the mashing technique to control thickness. The soup’s thickness is entirely under the cook’s control — the bean starch available in the pot is the thickener, and the more beans that are crushed against the side of the pot, the thicker the finished soup. This means there’s no specific “right” consistency — adjust to the household’s preference. A very thick, almost stew-like consistency is typical of traditional versions; a somewhat thinner but still substantial broth-forward version is equally valid.
The soup is better on day two. Like most long-simmered bean soups, ham and navy bean soup develops deeper, more unified flavor as it sits overnight in the refrigerator. The salt distributes more evenly through all the beans, the flavors meld together, and the ham’s smoky character permeates the broth more thoroughly. If serving for a specific occasion, making the soup the day before and reheating is genuinely worthwhile.
Frequently Asked Questions
Do I need to soak the beans overnight?
No — soaking reduces the cooking time and improves the bean texture, but it is not strictly necessary. Unsoaked dried navy beans will cook through during a two-and-a-half to three-hour simmer in a covered pot with adequate liquid. Add an extra cup of water or broth to the initial liquid to account for the additional absorption, and plan for the longer cooking time. The quick-soak method — cover beans with water, bring to a boil, remove from heat, soak for one hour, drain — is a middle option that reduces the cooking time without requiring advance preparation the night before.
Can I make this in a slow cooker?
Yes — the slow cooker is actually an excellent method for this soup. Skip the soaking if preferred (the slow cooker’s long, low heat handles unsoaked beans), sauté the aromatics on the stovetop and add them to the slow cooker, then add all remaining ingredients and cook on LOW for 8 to 10 hours or HIGH for 4 to 5 hours until the beans are completely tender. Remove the ham bone, pick and return the meat, adjust thickness and seasoning, and serve. The slow cooker version produces a somewhat thicker, more evenly flavored soup than the stovetop version because all the liquid is retained rather than partially evaporating.
Can I use canned beans to save time?
Yes — three cans (15 ounces each) of drained, rinsed canned navy beans can substitute for the dried and soaked beans. Reduce the broth to six cups (the canned beans don’t need as much cooking liquid as dried) and reduce the simmer time to 45 to 60 minutes — the canned beans are already fully cooked and only need time to absorb the broth flavors. The flavor of the canned bean version is slightly less developed than the dried bean version, but the convenience difference is significant. Taste and season carefully at the end as canned beans can vary considerably in their salt content.
What if I don’t have a ham bone?
Two to three cups of diced cooked ham plus one teaspoon of ham base (Better Than Bouillon Ham Base or equivalent) added to the broth produces a very good soup without a bone. The ham base provides some of the depth and smoky character that the bone’s marrow and collagen would otherwise contribute. Smoked ham hocks, sold fresh or cured at most grocery stores, are the best bone-in alternative — one large smoked hock produces excellent results and is designed specifically for this application.
Why did my beans not soften?
The most common reason dried beans fail to soften is that they are very old — dried beans that have been stored for more than a year or two have dried out to the point where their cellular structure makes them resistant to rehydration regardless of soaking and cooking time. Beans more than two years past their “best by” date may never fully soften. If the beans haven’t softened after two and a half hours of gentle simmering, they are almost certainly old and should be replaced. Purchase beans from a store with high turnover for the freshest stock.
Variations Worth Trying
Ham and vegetable soup version: Add one diced parsnip to the carrot and celery at the sauté stage, and stir two large handfuls of chopped fresh kale or baby spinach into the finished soup in the final ten minutes of cooking. The parsnip adds a sweet, slightly anise-adjacent depth that deepens the vegetable character of the broth; the greens add color, nutrition, and a pleasant slightly bitter note that balances the ham’s richness and the beans’ sweetness.
Smoky ham and bean chowder version: In the final fifteen minutes of cooking, stir in one cup of heavy cream and a cup of frozen corn kernels. Lightly mash about a third of the beans into the soup before adding the cream and corn. The cream produces a richer, more luxurious version closer to a chowder in character; the corn adds sweetness and a slight crunch that contrasts with the very soft beans. This version is particularly good in cold weather when a more indulgent soup is appropriate.
Southern ham and bean version: Replace the thyme with half a teaspoon of dried sage and add a pinch of cayenne to the spice mixture. Add one cup of diced turnip to the vegetable sauté alongside the carrot and celery. Use smoked ham hocks rather than a standard ham bone for a more assertively smoky, more distinctly Southern character. This version is closest to the traditional Southern preparation and pairs particularly well with cornbread and hot sauce at the table.
Tuscan white bean and ham version: Replace the navy beans with cannellini beans and the thyme with one teaspoon of dried rosemary. Add one 14-ounce can of diced tomatoes (undrained) to the pot with the broth. Finish the soup with a drizzle of good olive oil over each bowl and, if available, a Parmesan rind added to the simmering soup (and removed before serving) for depth. The rosemary, tomato, and Parmesan rind shift the soup’s character toward Italian bean soup territory — a substantial difference in flavor profile while using the same fundamental method.
Bean and ham soup with cornbread dumplings: Thirty minutes before the soup is done, prepare a simple cornbread batter (one cup cornmeal, half a cup flour, one teaspoon baking powder, a pinch of salt, one egg, and three-quarters cup milk stirred together). Drop tablespoon-sized dollops of the batter onto the surface of the gently simmering soup, cover the pot tightly, and cook for 15 to 20 minutes until the dumplings are cooked through (a toothpick inserted into the center comes out clean). The dumplings cook in the steam and absorb the ham and bean broth, producing a completely self-contained meal with no additional bread needed.
Serving and Storing
Ham and navy bean soup is best served in deep bowls with something starchy alongside for soaking up the broth — crusty bread, warm cornbread, or dinner rolls are all appropriate. A simple green salad with vinaigrette provides the fresh, acidic contrast that the rich, savory soup benefits from. For a larger gathering, set the pot on the stovetop on the lowest heat and let people serve themselves — the soup holds well at a gentle simmer for an additional hour after it finishes cooking, which makes it practical for gatherings where people eat at different times.
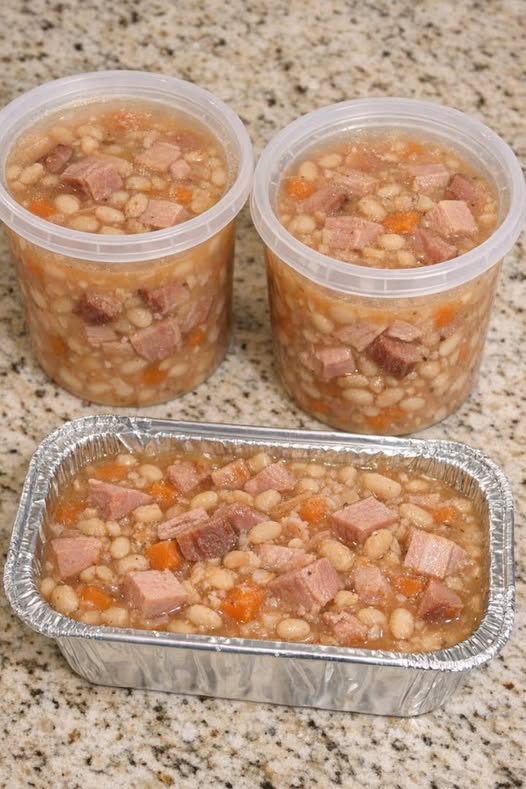
For storage, allow the soup to cool for 30 minutes, then transfer to airtight containers. Refrigerate for up to 4 days. The soup thickens substantially during refrigeration as the beans continue absorbing the broth — add a splash of water or broth and stir well when reheating to restore the original consistency. Freeze in individual portions for up to 3 months; thaw overnight in the refrigerator and reheat gently on the stovetop with additional liquid as needed. The soup’s flavor actually improves in the freezer — the extended cold storage allows the flavors to integrate more fully, and the thawed and reheated version is often noticeably better than the fresh-made one.
One Pot, One Afternoon, One Week of Good Meals
Ham and Navy Bean Soup is the rare recipe where the investment of one afternoon of gentle simmering produces a return in good meals that extends well beyond the evening it was made. A single pot provides six to eight generous servings, improves over the first two days, and freezes into excellent individual lunches or quick weeknight dinners that require nothing more than reheating. The flavor is the kind that both adults and children reach for without hesitation — deeply savory from the ham, substantial from the navy beans, rounded and warm from the aromatics and spices, and satisfying in the honest, unembellished way that long-simmered soups always are. That combination of value, flavor, and practical utility is why this recipe has been in steady circulation in American home kitchens for as long as anyone can remember.
Enjoy!