
The Nostalgic Power of the No-Bake Cookie
Headline: Kitchen Alchemy: Why Peanut Butter No-Bake Cookies Are the Ultimate 20-Minute Miracle
In the world of home baking, there is a legendary category of treats that requires no oven, no complex cooling racks, and almost no waiting time. At the pinnacle of this category sits the Peanut Butter No-Bake Cookie. Often referred to as “Preacher Cookies” or “Cow Patties,” these rustic, oat-filled mounds represent a brilliant piece of culinary engineering where simple pantry staples are transformed into a fudge-like delicacy in exactly 20 minutes.
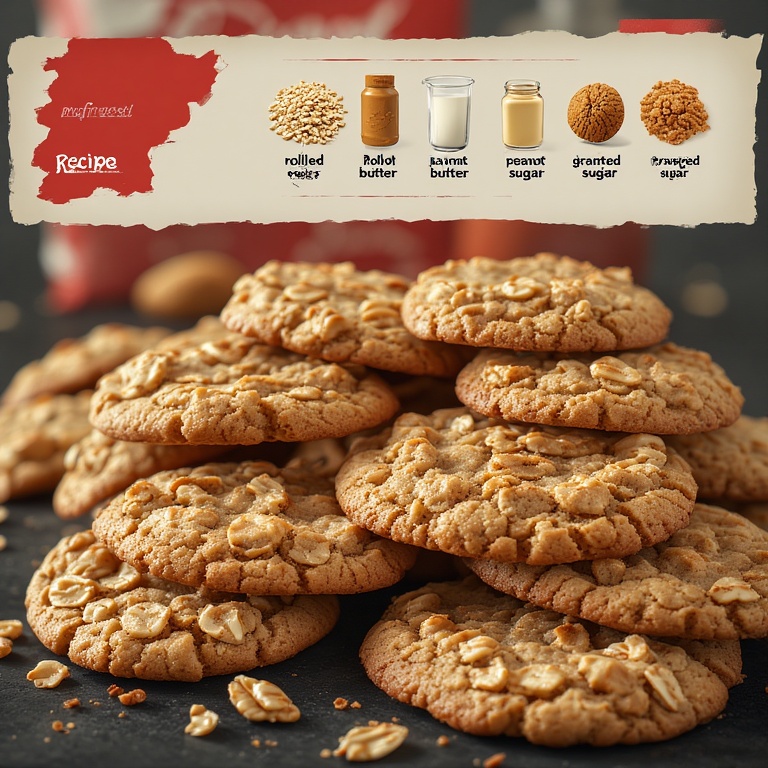
As you can see from the golden, textured clusters in our featured imagery, these cookies are defined by their rugged surface and rich, matte finish. They offer a unique textural journey: a soft, chewy bite from the oats, a creamy melt from the peanut butter, and a structured sweetness from the boiled sugar syrup.
In this exhaustive 2,000-word guide, we are diving into the science of the “Soft Ball Stage,” the importance of oat selection (Quick vs. Old Fashioned), and why specific brands like Quaker Oats and Domino Sugar have become the historical standard for this recipe. We will also address the most common “No-Bake” heartbreak—the cookie that never sets—and how to ensure your batch is perfect every single time.
The Depression-Era Roots of No-Bake Sweets
The history of the no-bake cookie is tied to times of resourcefulness. During the Great Depression and the rationing eras of the 1940s, fuel for ovens was expensive, and ingredients like eggs were often scarce. Home cooks discovered that by boiling sugar, butter, and milk, they could create a stable binder for affordable fillers like oats. This “boiled cookie” tradition evolved into the peanut butter version we love today, proving that gourmet satisfaction doesn’t always require a preheated oven.
Ingredients Deep-Dive—The Five Pillars of Flavor
Headline: The Anatomy of a Classic: Why Quality Ingredients Lead to a Better Set
As shown in our recipe breakdown, this dish relies on five primary pillars. While the ingredients are simple, their chemical interactions are complex.
1. The Fiber Foundation: Quaker Quick 1-Minute Oats
-
The Choice: Using Quaker Quick 1-Minute Oats is the industry secret.
-
The Science: Because this recipe doesn’t involve long baking times, the oats must be thin enough to soften slightly when hit by the hot syrup. Old Fashioned oats can result in a “birdseed” texture that is too tough, whereas Quick Oats provide that signature fudge-like chew.
2. The Creamy Binder: Creamy Peanut Butter
-
The Role: Peanut butter acts as both a flavor agent and a stabilizer. The fats in the peanut butter help the boiled sugar mixture remain pliable rather than turning into hard candy.
-
The Pro-Tip: While natural “oil-on-top” peanut butters are delicious, standard stabilized brands (like Jif or Skippy) work best for no-bakes because they provide a more consistent set.
3. The Fat Source: Salted Butter
-
The Balance: We use Salted Butter to provide a savory backbone to the intense sweetness. Fat is what gives these cookies their “melt-in-your-mouth” quality. If you use unsalted butter, a heavy pinch of sea salt is mandatory to prevent the cookie from being cloying.
4. The Crystal Structure: Domino Granulated Sugar
-
The Purpose: Domino Granulated Sugar is more than just a sweetener. When boiled with milk and butter, it creates a syrup. The duration of this boil determines if your cookie will be “soupy,” “perfect,” or “crumbly.”
5. The Liquid Catalyst: Whole Milk
-
The Emulsion: Milk provides the moisture needed to dissolve the sugar crystals. Using whole milk adds a level of richness that 2% or skim milk simply cannot match.
The Masterclass—Step-by-Step Instructions
Headline: The 60-Second Boil: Mastering the Technique of the Perfect Set
The most critical moment of this entire recipe happens on the stovetop. Follow these steps to ensure your cookies set firmly as shown in our photos.
Step 1: The Prep
Line two large baking sheets with parchment paper or wax paper. Once the batter is ready, you must move quickly before it sets in the pot, so having your “landing zone” ready is essential.
Step 2: The Mixing
In a large saucepan, combine 2 cups of sugar, 1/2 cup of milk, and 1 stick (1/2 cup) of butter.
Step 3: The Critical Boil
Heat the mixture over medium-high heat, stirring occasionally. Once it reaches a full rolling boil (where the bubbles cannot be stirred down), start a timer for exactly 60 seconds.
-
Too short: Your cookies will stay gooey and never harden.
-
Too long: Your cookies will be dry, crumbly, and sandy.
Step 4: Off-Heat Integration
Remove the pan from the heat immediately. Stir in 2/3 cup of creamy peanut butter and 1 teaspoon of vanilla extract until smooth. Finally, fold in 3 cups of Quaker Quick Oats.
Step 5: The Scoop
Using a large spoon or a spring-loaded cookie scoop, drop mounds of the mixture onto your prepared paper. You have about 3–5 minutes before the mixture becomes too stiff to scoop.
Step 6: The 20-Minute Wait
As noted in our image, these are ready in 20-mins!. Resist the urge to touch them. They need this time for the sugar crystals to lock around the oats and peanut butter.
Troubleshooting, Storage, and Global Variations
Headline: Beyond the Pot: How to Save a Batch and Keep it Fresh
Troubleshooting: The “Set” Issues
-
“My cookies are wet and sticky”: This usually means the 60-second timer started too early (before a full boil). You can save them by putting them in the fridge, or by crumbling the mixture over vanilla ice cream!
-
“My cookies are white and crumbly”: You boiled the sugar too long, moving past the “Soft Ball” stage into “Hard Ball” stage. They still taste great, but they will be brittle.
Storage and Longevity
-
Room Temperature: Store in an airtight container with wax paper between layers for up to 1 week.
-
The Fridge: Many people prefer these cold. In the fridge, they stay firm and fresh for up to 2 weeks.
-
Freezing: These are the ultimate freezer cookie. They don’t actually freeze solid due to the high fat/sugar content, so you can eat them straight from the freezer for a fudge-like treat!
Creative Variations
Once you master the base recipe shown in our image, try these:
-
The Cocoa Classic: Add 1/4 cup of unsweetened cocoa powder to the initial sugar/milk/butter mixture.
-
The “Everything” No-Bake: Fold in a handful of shredded coconut or mini chocolate chips during the final mixing stage.
-
The Protein Boost: Swap half the oats for hemp hearts or crushed flax seeds for a more nutrient-dense snack.
Conclusion: A Legacy of Simple Joy
The Peanut Butter No-Bake Cookie is a reminder that the best things in life don’t have to be complicated. It is a recipe that bridges generations, requires minimal cleanup, and delivers maximum flavor in a fraction of the time of a traditional bake. By following our “60-second rule” and using the high-quality ingredients pictured above, you are guaranteed a batch of cookies that will disappear from the plate in minutes.